- What is this?
- So you want to have a Little Printer
- What you’ll need
- How does this all work?
- How to get started
- Let’s make a (fake) printer
- Wiring it all up
- Setting up python-paperang
- Setting up sirius-client
- Credits
- FAQ
- What we need help with
- History / timeline
- Links
- Other

What is this?
The Little Printer was a cute internet-connected thermal printer released in 2012 by BERG. The company shut down in late 2014, and so did the servers at the end of 2015. They open-sourced a minimal reimplementation of the server, which was later extended by Nordprojects, along with releasing a new app, in 2019. With that, people with Little Printers could use them again after hacking their BERG Cloud Bridge. You can’t really buy a Little Printer anymore; this page is all about making your own.
So you want to have a Little Printer
Good news! You came to the right place. This page (hopefully) contains all the information and tools you need for it. But first: join our Discord! It’s where all the development happens, and where you can get help if you get stuck with something.
What you’ll need
- A thermal printer, like the Paperang P1. There are several places where you can buy one: Amazon (US, UK, DE), Thepaperang, Paperangprint, Aliexpress and so on. Don’t forget to buy a few rolls of paper for it; you can find them in many colors, and sticker paper is especially fun!
- As an alternative, you can use any thermal printer that uses the ESC/POS protocol. This guide was written with the Paperang in mind, but you can skip the irrelevant bits and use the
escposdriver insirius-client. - Ideally, a Raspberry Pi with Bluetooth, but we’ve tested this with a Mac as well, and with some tweaks, it should work on any computer with Bluetooth running *nix.
- Node.js 10, Yarn, Python 3.7, Docker.
- An iPhone for the app, but you can use the web client as well (with reduced functionality).
How does this all work?
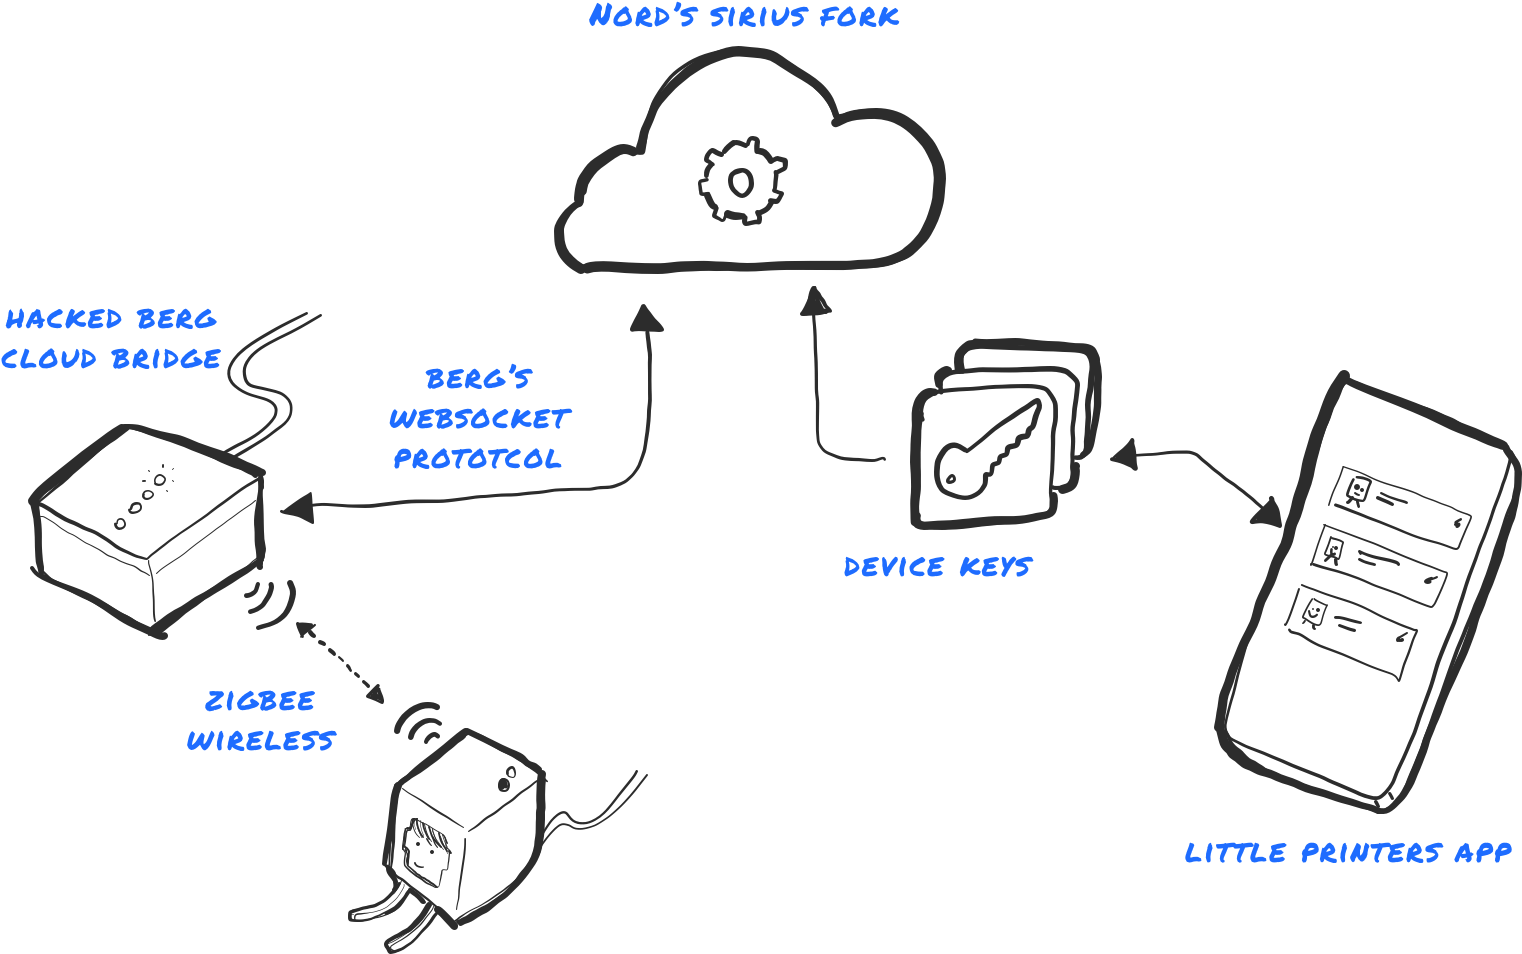
I’m going to use this useful graph from Nordprojects:
 © Nordprojects, 2019
The original Little Printer architecture required two devices: the printer itself, and the bridge. The printer connected to the bridge via Zigbee, and the bridge connected to the BERG Cloud (which was replaced by the sirius project — see below). The BERG Cloud Bridge acted as a platform for an envisioned ecosystem of IoT devices, that never really materialized. The client (sirius-client — we’ll get to that soon) acts as the bridge and has various “drivers” for printers.
 © Nordprojects, 2019
How to get started
(If you have an ESC/POS-compatible thermal printer or you don’t have a printer yet: create a fake printer below then jump to the FAQ.)
We’ll assume you have a Paperang P1. Great! You can already use it via its app on your smartphone, but that’s not what we’ll do, at least, not for the most of this. One thing you should do before we start: open up the app, click the three dots on the top right corner, select your Paperang and under “Automatic Shutdown Settings”, set it to “Non-automatic close”. This prevents it from going to sleep.
Connect your Paperang to a power source with a USB cable to prevent drain. You can communicate with the printer via USB, but for now, we’ll just use Bluetooth.
Pair your Paperang with your computer over Bluetooth and make sure you have Node 10, Python 3.7 and Docker installed.
Let’s make a (fake) printer
This project is predicated on us pretending to be a Little Printer, so let’s do that.
First, visit this website that generates the required *.printer file for you. Download it and guard it with your life; this is your printer now.
The generated printer file will look something like this:
     address: db708b77ae2ee5b5
      secret: 1011795836314
  claim code: fojy-q4xv-7pe2-xt00
Next, we’re going to claim the printer on Nordprojects' sirius instance. Sign in there with Twitter, and click “Claim a printer”. Enter the claim code you have and give it a name, then hit “Claim Printer”. Note: the claimed printer will not show up on the UI until you connect it to the server (see the next section).
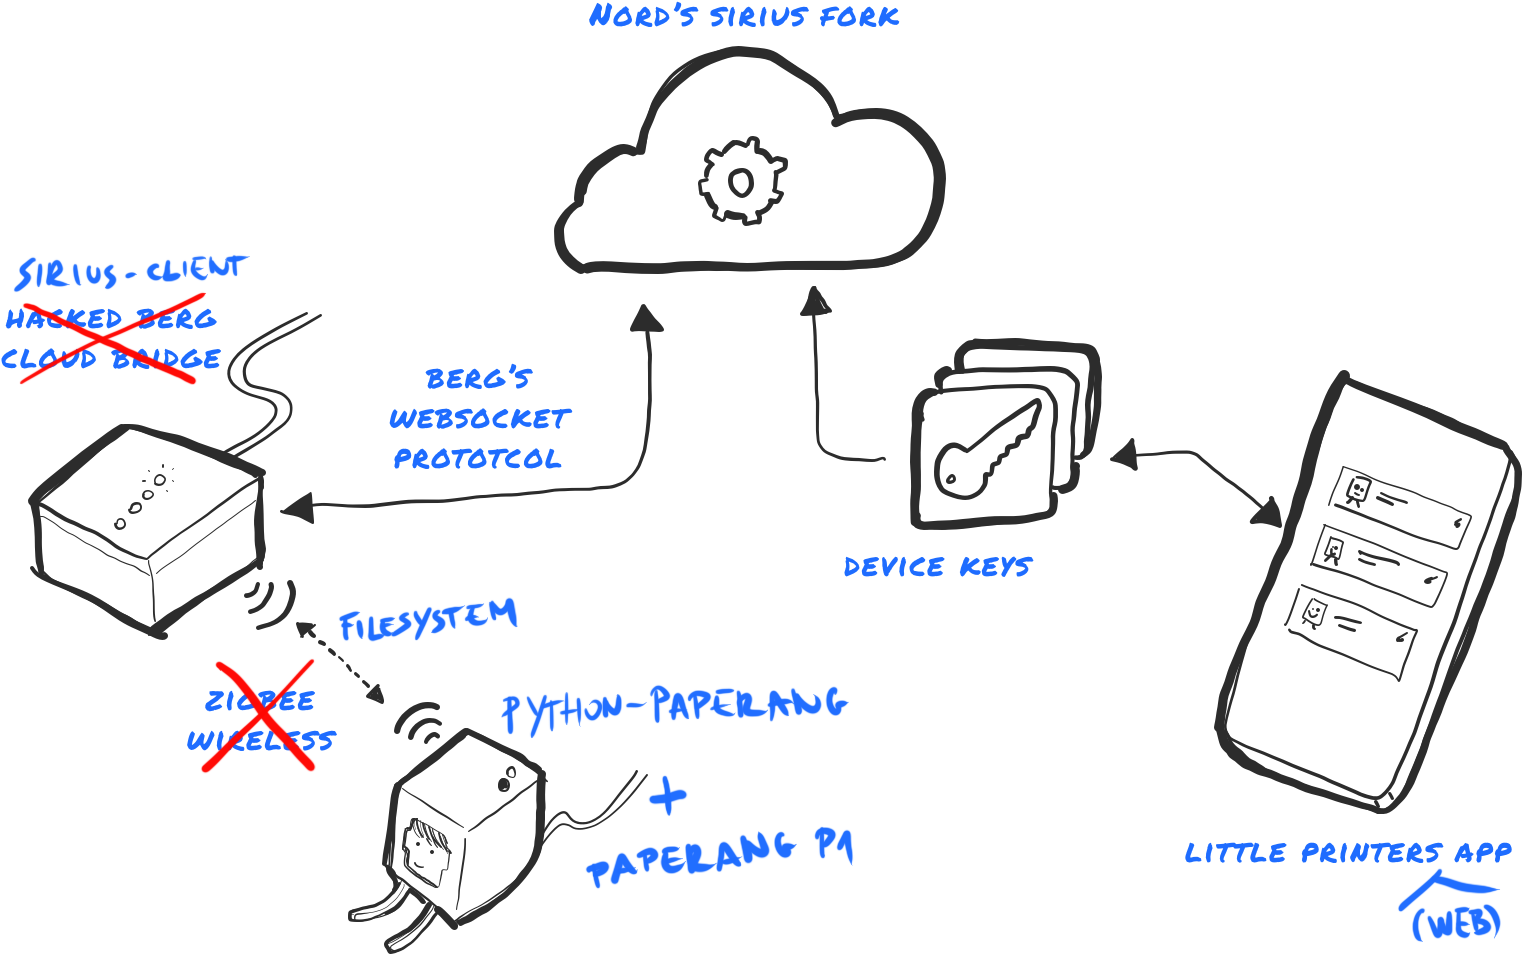
Wiring it all up
Next, we’ll put it all together, connecting our Paperang to the network. For that, we use two projects: sirius-client and python-paperang. They should really be merged into one. One day.
Anyways, clone both of them from Github, and we’ll start testing things first with the latter project. We’re going to assume you have at least a passing understanding of both Python and Typescript.
Setting up python-paperang
If you’re on Linux, and we’ll assume Debian (or Raspbian), you’ll need the following packages installed: build-essential libbluetooth-dev libhidapi-dev libatlas-base-dev python3-llvmlite python3-numba python3-skimage python-llvmlite llvm-dev cython3 python3-skimage.
Install the requirements: pip3 install -r requirements.txt.
Create a config.py based on config.example.py. If you don’t have the MAC address of your paperang, that’s fine; just use an empty string and the code will find it.
Run printer.py to print a self-test. If you did everything well, you should have a bunch of infos printed on your Paperang! You can also edit this file to print any arbitrary image, processed with the famous Atkinson dithering algorithm.
Setting up sirius-client
Next, let’s get sirius-client working.
You’ll need npm and ts-node installed; to do that on Debian/Raspbian, run the following:
sudo npm install -g ts-node
You’ll also need to install yarn if you don’t already have it. On Debian, you should follow yarn’s specific install instructions. Come back here when you’re done.
Now run yarn install.
Time to run sirius-client! add the path to the printer file you generated as a command-line argument:
yarn ts-node bin/client.ts run --uri wss://littleprinter.nordprojects.co/api/v1/connection -p ~/my-printer.printer -d filesystem
Now run python-paperang with python3 littleprinter.py, and you’re ready to print something!
Go back to Nordprojects' sirius instance, and your fake little printer should show up. If not, claim it again, and then it will work. Save the device.li address, you’ll need it.
Get the app (or use the web client), add a printer via its device.li address, and print something! Or use the API. Go wild.
Credits
First of all, follow us on twitter (@tinyprinterclub)!
Major contributors to this project include Tamas Kadar (KTamas) (email, twitter), Joshua May (notjosh) (twitter) and Monica Farrell (twitter). Watch the !!Con 2020 talk “Little Printing for Everyone!!1” by KTamas once it’s published on YouTube. The “how does it work” image was created by Nordprojects.
FAQ
Q: Why?
A: Because it’s fun.
Q: Do I need a Paperang P1, specifically? Can’t I just use something else?
A: Of course you can! sirius-client already has a generic escpos driver, which lets you connect a wide variety of thermal printers that use the ESC/POS protocol. It also has a simple console driver, that simply shows the image your printer would print. There is nothing stopping you from making your own driver to your favorite printer of choice.
Q: What about the other Paperang models (P2, P2S)?
A: We think they should work, but we have not tested them yet. Assuming they do, there is another caveat: they print at a higher resolution. The P1 has the exact same resolution as the original Little Printer, and the server sends pixel-perfect bitmaps — for now — to the client, hence this is not a problem with that. There are plans to modify the server so it supports more resolutions; you’re very welcome to contribute.
Q: Where can I get a real Little Printer?
A: I mean, eBay, if you’re lucky. I’ve been looking for a while now, and it seems like noone wants to sell theirs.
Q: What if I have a real Little Printer and I want it to connect to the new network? A: This document should have all the information you need. You’ll have to flash your BERG Cloud Bridge. Unfortunately, it has a hardware bug: there is about a 1-in-100 chance you will brick it when you flash it. Not much can be done about that.
What we need help with
- Reviewing PRs for
sirius, merging headless chrome - Porting
python-paperangto Typescript and/or improving communication between that andsirius-client - Building lots of cool services
- Checking out Paperang clones, see if they work with the library or not
- Building an Android version of the app (source code)
- …and so much more
History / timeline
- (November, 2011) Hello Little Printer, available 2012 (Product announcement link)
- (March, 2012) Little Printer homepage
- (May, 2014) BERG Cloud shop
- (July, 2014) Little Printer homepage
- (September, 2014) Week 483 (BERG is shutting down)
- (September, 2014) The future of Little Printer
- (March, 2015) Trying something (Announcing
sirius, the new backend for the BERG Cloud Bridge) - (March, 2015) genmon/sirius
- (March, 2015) A little longer (Keeping the servers running for a few more months)
- (December, 2015) End of 2015 (People working on Sirius, Bridge can be updated to use it)
- (December, 2015) Updating the Bridge
- (December, 2015-July, 2019) Directing the BERG cloud bridge (long GH issue, important historical document about the “lost years”)
- (May, 2019) Little Printer returns as an open-source messaging device
- (May, 2019) Little Printers, a friendly new messaging app and cloud platform. (Nordprojects' announcement of the new app, working server, api, device.li etc.)
Links
Code
- nordprojects/sirius (the server’s code)
- nordprojects/littleprinters-ios-app (the iOS app’s code)
- andrewn/littleprinters-web (port of iOS app to the web)
- notjosh/sirius-client (notjosh’s universal client for
sirius— WIP) - ktamas/sirius-client (KTamas' fork of the client — older, but works)
- tinyprinter/python-paperang (the python library that connects to the Paperang P1, with the protocol reverse-engineered)
- sirius-image-decoder (detailed exploration of decoding images coming from sirius-server, with working code)
- tinyprinter/tinyprinter.club This website! Feel free to add more information to it and submit a PR! It’s built with hugo.
Discussion/community
- Join our Discord!
- Check out this GitHub issue for past discussions.
Code of Conduct
- You can find our CoC here.
Other
Misc notes ignore for now
BERG Cloud Bridge sits by your broadband router and wirelessly connects Little Printer to the web, which makes it easy for you to place Little Printer where you can see it.
Addendum: how the whole fake printer thing works (by Josh)
Josh: It takes the printer ID (mac address of printer iirc, that you can generate) and makes a random 16 digit code (“claim code”). From there, it posts that to the server as part of the normal handshake. Then the device just…waits. eventually the user logs onto the server, types in claim code, then you own that printer ID, and the server will start firing payloads at it. It’s all very….simple. no like, fancy key exchange, or identification, or anything.
KTamas: right, so if i want to make a new printer, what do i do?…
Josh: so, the most reliable way to make a printer is to clone https://github.com/nordprojects/sirius then run ./manage.py fake printer -> generates *.printer file. Looks like:
  address: abcdef0123456789
       DB id: 8
      secret: 4a8489a9b8
  claim code: 123a-456b-789c-012d
Sso that is “a printer”, essentially. but what do we do with that? … well! When we connect to the server (via websocket), we don’t need to send any special “it’s my first time” payload, we just send a regular payload every time, that looks like:
{
    type: 'BridgeEvent',
    json_payload: {
      ncp_version: '0x46C5',
      uptime: '45.71 23.94',
      firmware_version: 'v2.3.1-f3c7946',
      network_info: {
        extended_pan_id: '0xredacted',
        node_type: 'EMBER_COORDINATOR',
        radio_power_mode: 'EMBER_TX_POWER_MODE_BOOST',
        security_level: 5,
        network_status: 'EMBER_JOINED_NETWORK',
        channel: 11,
        security_profile: 'Custom',
        power: 8,
        node_eui64: '0xredacted',
        pan_id: '0xDF3A',
        node_id: '0x0000',
      },
      name: 'power_on',
      local_ip_address: '192.168.1.98',
      uboot_environment:
        'long text',
      mac_address: 'redacted',
      model: 'A',
    },
    bridge_address: 'redacted',
    timestamp: 1426256447.70695,
  }
(Much of that can actually be ignored I think - sirius isn’t using it - but that’s what it looks like.) So that gets the bridge online, not the printer. To get the printer online, it sends a packet afterward that looks like:
{
    timestamp: 1419107228.91187,
    type: 'BridgeEvent',
    json_payload: {
      name: 'encryption_key_required',
      device_address: 'redacted',
    },
    bridge_address: 'redacted',
  }
So at that point, the server knows about that bridge, and now it knows the printer on that bridge. That’s all the client does. on to the server claim code! Tong story short, it mostly lives here. So when you type a claim code into the website, it gets unpacked to find the bridge ID and the device ID and then it associates that device to your account. voila! THE GOOD NEWS IS that in searching for that, I found an actually documented summary of what claim codes are.
KTamas: and after all this, it appears permanently on device.li?
Josh: Yurp, essentially. I guess technically “until someone else claims it”, if the device is reset etc. but I don’t know if that regenerates the ID, or if it’s truly based on the mac address I guess it could be easy enough to make a lil microsite that generates new addresses + claim codes, to make this part easier.